Showing posts with label Challenge. Show all posts

Tuesday, November 8, 2011

Create-A-Card sketch 11-8-2011

Here's another Create a Card sketch cardHere's what I did with the sketch...
Here it is again. Above is the photo-edited version, while below is the straight from the scanner version (I still don't see the red looking like it does in real life in either photo).

I used Magic Mesh and since I didn't have to adhere it down with extra adhesive, I'll have to hope it stays on. The corners were created with my Creative Memories punch and the sentiment was made with my computer. The candle image is a CDAC Progressive Challenge image colored with my alcohol markers (no matter what I tried to do, I couldn't get the shading of the white candle to show up). I also used the gold glitter specia pen on the candle and the yellow one on the flame.

Thanks for looking,
Cheri

Sunday, October 30, 2011

Progressive Challenge #5


Here's another CDAC Progressive Challenge image. I also did a Sew Many Cards sketch that I found and a color challenge by A Muse Studio to use French Roast Brown and BubbleGum Pink. The Pink paper is a digital paper called DiamondGirl from Gina K at Stamp TV.

Sunday, October 2, 2011

Progressive Challenge #4 and a B-day Card for little girl

This card is just to show off this amazing "Mystical" design by Daisy Doodles another image in the Crafters Digital Arts Center Progressive Challenge. Besides the Sew Many Cards image, this was my favorite image for this 4th round (as you may remember, I used to be on the design team for SMC until Cub Scouts took away all my free time). I colored it with my colored pencils. Because of the incritracties of the image, I decided the background needed to be simpler.


This is an image from a previous CDAC challenge. It's hard to tell but the dress and shoes are glittery because they were colored with the Specia pens. Also difficult to tell, the flowers have a little Matte Accent dimension on them. The background was made by taking the edges of border stickers and randomly applying them to the card front. The edge of the image circle was edged with red, while the purple circle and the sentiment "plaque" was edged with green.

I forgot to give this card to the little girl it was intended for (hubby rushed us out the door before I was ready) and had to give her a store bought card.

PS Please excuse me for not responding to your comments but Blogger changed something and now I can't stay logged in when I use IE as my web browser.

Monday, September 5, 2011

Create-A-Card sketch 9-6-11

Time for another Create-A-Card SketchFirst thing you'll notice is that I didn't make this into a tall skinny card but made it be the standard 5x4ish size.
Second thing you'll notice is the lack of horizontal ricrac on the middle paper. I thought the dotted lines that looked like lined paper was reminiscent of kindergarten and the ricrac or ribbon would hide them.

I use three sheets of designer paper from the same pack (a Hobby Lobby exclusive - or at least I didn't see it anywhere else and I got it several years ago and never saw it again) and mounted it on brown cardstock. The ribbon was a Martha Stewart package of pre-made bows on close out at Walmart that I had to glue on because the adhesive had already "given up". And lastly, the image that I colored with my Bic markers is from the CDAC Progressive Challenge. I participated last month and got new images to play with this week. Hopefully I can do it again and continue to the end of the challenges.

Monday, August 8, 2011

Bookmark Card


It's kind of hard to see (don't know why it ended up looking so small - must be the ribbon extending above) but this is a bookmark card that I made so I'd have another Birthday Card ready to go (Septemeber is full of B-days). I may have to try and get a better scan of the card - or at least of the colored image so you can see the details better. I colored my image with Prismacolor and other alcohol markers. I used Glossy Accents on the cherries on the cake and on the buttons on the coat. The rectangular edge of the image was distressed and mounted onto tan cardstock. I used that same tan cardstock to stamp the sentiment then mounted it on dark aqua cardstock. The ribbon on the detachable book mark was put thru a hole but the ribbon was too stiff to make a good knot, so then I glued it. The glue made the paper weak so I added some scrap of cardstock to reinforce the area and stapled the ribbon. I stamped a small polka dotted gift box on the plain side.

I made this card to fit specific challenges:
First I got the image for a Progressive Challenge. Do this first challenge to be able to particpate in the next one. I got half a dozen images to chose from (you'll see the some of the others in other cards soon) but I thought this one could make a good B-day card.
Another challenge this can go for is Spots and Dots by Stampin' for the Weekend.
Also Raise the Bar has an open, anything-goes challenge.

Be sure to check out my other cards (there'll be another new one tomorrow/Tuesday). Thanks for looking at my creation.

Saturday, June 19, 2010

Puppy Love

I was following Stampavie's sketch and Color Q's color pallet. I colored Hershey the puppy with my alcohol markers and used some scraps of cardstock and designer papers. The flowers are from Oriental Trading Company Summer Fun and the eyelets came from Spare Parts by the Paper Studio. I decorated my solid cardstock with the Sizzix Folder Swirly Vines with Hearts.

Added: I was typing in the challenges (and entering them in at the same time) but a transformer blew the power out and blogger hadn't done an auto save at this point so I'll have to add the people and challenge blogs back in as the comments are left.


Challenges:
Fun with Shapes: Flowery
Polka Doodles: Male
One Stop Crafts: "One for the Boys"
Mark's Speedy Cat: Embossing
Lexi's Creations: Something Old (eyelets - bought them long before my LSS closed down)


Thanks for looking and don't forget to enter my blog candy give away.

Tuesday, June 15, 2010

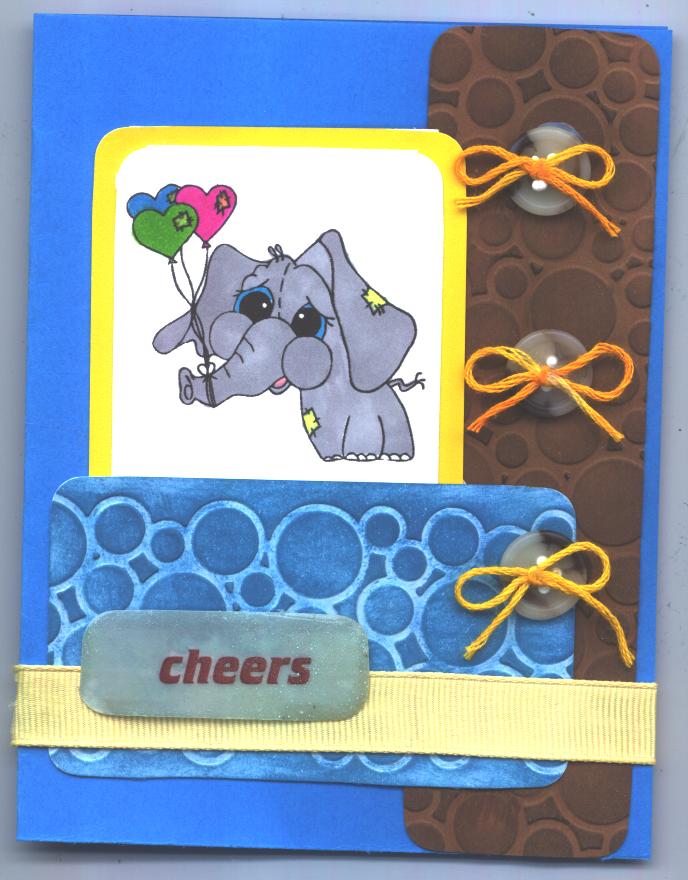
Birthday Cheers


I colored Sew Many's Eris the Elephant With my alcohol markers. I keep wanting to paint the toenails pink or red - LOL. Anyway, I used a quickcuts embossing folder simply named Circles for my decorated rectangles and inked them in brown or dusk blue respectively. I used a pre-adhesive yellow ribbon. Then I took a scrap of the blue cardstock, rubbed the sentiment on and coated it with clear embossing powder several times. After hunting for three matching buttons, I threaded them with some variegated yellow embroidery thread and tied them into bows. I then used my trusty Scotch Quick dry Adhesive (it wasn't not quite dry when this picture was taken but I have a deadline to make)

Challenges to enter this card in:
Just Us Girls: Digital
Crafty Ho's: Bright Colors
Paper Craft Planet's sketch of the week
Pals Paper Arts: Color Challenge - Burmuda Blue, Bright Yellow, Sof Suede (or my closest approximations)
Speedy Cats Friends: #7 Make your Own Background
Old Challenge Marks Finest's Papers: Buttons and Bows


Thanks for looking.


Wednesday, June 9, 2010

Elephant Riddle & Pink Flamingo

RIDDLE ANSWER: See if he brought his trunk.

I used another improved Sew Many Cards image - Eris. I used Stacey's Curtain Color Call #33 of Celery Green, Navy Blue, Sky Blue and White and Paper Craft Planet's sketch for the week. Since I have a riddle, I think that qualifies this card for the Child's Play challenge at Crafty Creations.


I like Stacey's color combo #32 from last week (but then it disappeared when my computer re-booted and for some strange reason I was unable to find it again) so here's a card with that color combo too. My mother-in-law has a friend that likes flamingos so I'll let her give this card to her.
I used a Dustin Pike freebie image. I used an red/pink printed paper that I don't know the name of the pack it came from (I remember I bought it at Walmart but that's all I know about it), then chose an apricot colored cardstock to run thru my Cuttlebug with a Quickcutz floral folder. I colored the raised flowers with a golden-yellow and then a pink ink pad. I used a scrap of yellow ric rac that I have no idea where it came from (I think it might have been in my sewing stash but not sure where it came from...garage sale, what-cha-got-box, given by friends or family, some other??). The pink ribbon came from Target's dollar bin. I typed up the Happy Birthday sentiment with MS Word.

Challenges for this card:
Crafts & Me: Friends and Family
The Creative Cottage Challenge: Pink
Creative Belli: Old & Forgotten (yellow ricrac)

Thursday, June 3, 2010

Tayla with balloon

Here's is another "new and improved" Sew Many Cards image: Tayla with Balloon. I colored Tayla with colored pencils and embossed the red oval with the paisley cuttlebug folder. I 'smooshed' brown chalk on the oval to "age" it and inked the edge in blue cyan ink. I further aged the card using brown cocoa ink on the edge of the card. It ended up a bit plain so I added white to the red and I think that improved it.


Challenges:
Ann's Creative Nook - Red, White, Blue
Techno Stamper - sketch

Here's what Tayla used to look like. The biggest difference you'll notice is the party hat. I tried the party box instructions provided by The Wild Flower Patch

Wednesday, June 2, 2010

Tayla with Cauldron


Image: Tayla with Cauldron from Sew Many Cards http://sewmanycards.com
Markers: Sharpie and Bic
Cardstock: scrap packs, I chose bright orange, peach, golden yellow and grey
Ribbon: Unknown
Embossing Folder: Cuttlebug Pumpkin Harvest
Ink on pumpkins: Cats Eye Yellow Citrus
Glitter glued on with Ranger Inkssentials Matte Glaze


Challenges:
Paper Craft Planet's Color Challenge #69
Midnight Madness Sketch #56

Thursday, May 13, 2010

SMC CHALLENGE # 14


The challenge this week is to make an Easel card. Turns out that it isn't so difficult...esp. if you have Sure Cuts a Lot and a cutting file that's been created (although I think I could do this without the cutting file now that I have read a tutorial and actually made one). I decided that I need to build up my birthday card supply for next school year so I'm going to be making them (and thank you cards) for a while. I used Miki with Cake image and colored him with Prisma markers. I used a dab of Tulip brand gold fabric paint for the candle flame. I inked the edges of my scallops with a blue Cat's Eye pigment ink pad. I also used that same ink pad for the Happy Birthday sentiment inside the card.

Be sure to check out the Sew Many Cards store for an awesome deal for the month of May. I'm planning on it {wink}.

Monday, April 19, 2010

Hang in There!


Hang in There

Background paper: Jillibean soup Black Bean Choppen onion

Red cardstock: JoAnn’s Scrap pack

Girl Stamp: The Angel Company wonder and joy

Ink: JoAnn Craft Essentials Pigment

Ink in black

Sentiment: Printed with computer, Comic Sans MS font

Ribbon: No Name from Target dollar bin

Colored with colored pencils (crayola, rose art, and some literally with no name on the side)

Embellish Magazine Red,Black.White,Kraft

Play Date Cafe Black, White & splash of color

Love You!


Background paper: Jillibean soup Black Bean Choppen onion

Heart Stamp: Sew Many Cards digital stamp Heart Present

Ink: JoAnn Craft Essentials Pigment Ink in black

Sentiment: Stampendous Personal Notes Mini Quad Cube

Embossing Powder: Stampendous Midnight Black

Colored with colored pencils (crayola, rose art, and some literally with no name on the side)


Challenges:

Embellish Magazine Red,Black.White,Kraft

Play Date Cafe Black, White & splash of color

Sunday, April 11, 2010

one stamp - two different cards

I was sent these images for a swap.
And here's what I came up with.

I used colored pencils on the first image.
I also followed the current challenge at PaperCraftPlanet. Raise the bar challenge wants to see me "Spring for it" with flowers. I have the flowers in the vases and one on the ribbon plus the brad is a flower too. That makes 6 flowers total. I also used a thick chipboard tag from Flower Fairies (freebie set that came with a magazine bought at Barns & Noble). All edges were inked with Rubber Stampeed lilac ink (qualifying it for One Stitch At a Time's distressing challenge and Your Next Stamp's challenge to use purple.
* * * * * * * * * * * *
For my second card I used watercolors. I also tried out my Alcohol Inks. They were a lot of fun to play with (I made several "papers").
I colored the vases with aqua and blue pan watercolors (those are the kind you had as a kid in school). The flowers were colored with watercolor markers (various brands). I chose to use Lili of the Valley's color scheme of blue and silver (thus the color combo of Stream and Silver inks in the blending handle) and follow a sketch that is coming up on Create A Card. Lots to Do wants to see embossing so I embossed the bottom rectangle using Morroccan Screen, the side block with Checkerboard (both tilted) and the image mat using Oriental Weave (all Cuttlebug folders).

Thursday, April 1, 2010

SMC's April Blog Hop

APR MONTHLY SPONSORS (prizes will be awarded during the New Release Blog Hop)
APR 1st -- APR 29th
THE CUTTING CAFE ... OWNER -- REGINA EASTER

The cuttingcafe blinkie

Prize package -- 3 Stamp Sets of winners choice

Hello my name is Regina Easter. I have 4 wonderful children and an awesome supportive husband. I have for as long as I can remember loved all the aspects of creating things with paper and drawing. So it was only fitting that I decided to open up The Cutting Cafe'and I am loving every bit of this new venture. The Cutting Cafe offers affordable Printable Stamps and Cutting Files. The Cutting Files which are basically just like templates are files that you Print out using your home printer, Cut, Assemble and then Embellish.....Very Easy.....The Cutting Files also come in the format where you can cut out the files using some of the latest Machine Cutters like the Pazzles Inspiration, Bosskut Gazelle and Cricut (with Scal software). The Printable Stamps are just that, images that are sent to you through email that you print out using your home printer. After the images are printed out, you can just color them in like you would any other stamped imaged...One great thing about the Printable Stamps and Cutting Files is that you no longer have to worry about finding space to store all of your stamps....You can keep them all in a folder in your computer and use over and over again.


MONTHLY SPONSOR for 2010 --SIMON SAYS STAMPS
APR 1st -- APR 29th
Sponsor Prize Package -- $10 Gift Certificate
Photobucket

This blog hop will run from today, April 2nd until April 8. On the 9th, the winner will be announced. Thank-you for taking the time to hop along. You should have come from Mary S.'s blog. When you are finished hopping, why not check out the Sew Many Cards Store! There you can find the current challenge and this week's Friday Freebie.

I'd would like to also remind you of the monthly challenges we have at Sew Many Cards Challenge Blog!
My creation this week is a card....they are my favorite thing to make. I love to color, as you know if you've visited my blog much! Angela is ushering spring in with some very cute images. I have GIRL WITH HEARTS to show you.

I colored the girl with my alcohol markers (my one Copic flesh color and the rest of them are Bic, Sharpie, or Prisma color markers). I used a teal green ink and a makeup sponge to sponge the edges of the light blue cardstock. I also used it on the smaller orange flower. I used 3 orange brads from Making Memories Citrus and the flowers are Making Memories Hulabaloo. The Springtime sentiment was in a grab bag from Boni back when I was on the SSDS design team. I'm able to find everything now that I'm finally getting my craft room back. :)

Now, to continue the blog hop, please visit Amber and if you'd like to see the Friday Freebie in use, please scroll down to my next post. Don't forget to leave me a comment if you'd like a chance to win a free SMC digi-image.

And now for the challenges:________________________
Sketch & Stash Challenge: Their Sketch
PaperTake Weekly Crafty Creations: Anything
Quirky Crafts: flowers
Stamptacular Sunday: Flower Power
Totally Paper Crafts: Digital
Stampative: Friendship
The Crafty Pad: Green, Orange, & Yellow (I know there's not much yellow but hopefully enough)

Tuesday, March 30, 2010

birthday card


Yeah, I know Tuesday is almost over but I've been making so much headway with my craft room that I almost didn't stop to make my card(s).


I used Jaden saying hello to a butterfly image from Sew Many Cards and colored it with my Bic and Prismacolor markers. I also tried to follow the sketch from 365Cards. It's Sew Many Cards week there so I thought I ought to try and post to it too. I made my background by rubbing a Big and Juicy Herb Garden ink pad on it. I wasn't totally happy with the coverage (darker in spots) so I took my Studio G glitter glue in dark pink and smeared it across the blue/green ink. I also used that glitter glue on the flowers by Jaden's feet. I used an adhesive backed ribbon across the top of my card, and cut an oval with my Creative Memories cutting system on a scrap of dusty pink paper. On that oval, I stamped Happy Birthday and put dots around the edge. I took some mini tropical-colors flowers and glued them to the bottom right corner because it seemed like it needed something more. Then I decided the white rectangle looked too stark and straight so I used a tearing edge ruler to draw and color a torn edge look to it.

Thanks for looking at my card.

Thursday, February 25, 2010

Sew Many Cards March Blog Hop

Welcome to another Sew Many Cards Blog hop. If you've been following our blog hops, you know that you have a chance to win just by commenting on my blog. You should have come from our fearless creator ANGELA http://digital.sewmanycards.com

And when you get done here you will go to our fearless leader JERI http://craftyjsplace.blogspot.com

But, before you go, you should see the card I made with Fawn and the Easter Egg.

I printed out Fawn first on regular white cardstock then again on my pink paisley printed paper. This gave me eggs the same size so I could cut out the paisley eggs and glue them over the white eggs. I chose to keep Fawn larger than I normally do so I could use matte accents on the jelly beans and make them seem real (you should feel each bump of a bean - they seem so real!) I used pastel sticker letters that came from Dollar General to make my "Happy Easter" greeting.
inside of card
I got the poem from Free Crafts and Games I matted it in more of the pink paisley paper leaving room on the right side for some greeting or signature.
Come back Tuesday to see what I make with today's Friday Freebie. Go get your's now!(Find it at the end of the blog hop on the Sew Many Cards Challenge blog.)

I'm going to enter this card into several challenges:
Quirky Crafts: Cute (is there anything cuter than SMC's images?)

I Love Digi: Pink

Dancing in Pajamas: Spring time

ABC-Challenge: O is for...One paper

Die Cut Dreams: Easter

Incy Wincy: "Touchy Feely"

Inky Impressions: Think Spring

Your Next Stamp Challenge: Spring Colors

Don't forget about using your digi's on your scrapbook pages. Check out SMC's PaperCraftPlanet group for layout challenges at http://www.papercraftplanet.com/group/sewmanycards.

Before you go to Jeri's blog, don't forget to leave a comment here so you can have a chance to win a free image. I'll draw a random winner (or maybe I'll let my kids draw a name out of the hat) and post it sometime around March 5th.

Friday, February 12, 2010

SMC/SSDS: Follow the Sketch & Follow the Hop

Photobucket
It's a Blog Hop for Stamp Scrap and Doodle and as one of the former founding members, I was invited to join them. The "Hop into Love" blog hop will begin Feb 12th at 10am CST and will end Feb 14th at midnight CST. All we had to do was follow this sketch.More details on my card after some information about the hop.

There are lots of prizes for the hop: You will need to comment on everyone's blog and then comment on the SSDS blog letting them know when you are done. There will be a prize for someone who comments on everyone's blog. A prize for someone who completes the sketch and links it to the SSDS blog before the end of the crop. And one prize for a new follower. That's 3 prizes!.
Here is the blog hop order in case you get lost:
SSDS (http://ssdschallenge.blogspot.com/)

And now for my card...Of course you are going to see a Sew Many Cards image. (FINALLY: THE CARD you're thinking, aren't you. LOL) First, I took the sketch and rotated it. (If you want to see a card with the sketch's original orientation, go to last week's SMC card.)
SMC's challenge is a color challenge to use Red, Pink and White. I used a pink card stock base, a left over piece of Christmas wrapping paper (the vertical piece), a scrap of pink DCWV paper (the horizontal piece) and regular typing paper for the oval. I used a white ribbon, red button, white card stock (from the baby card I made Tuesday), and red colored acrylic discs, a.k.a. "dew drops". I colored my SMC image Heart Gumball Machine with colored pencils (the hearts inside the globe), Prismacolor markers for the "main body" of the gumball machine, and I used Glossy Accents to make a shiny globe.


Now for the card challenges I tried to incorporate into my card (not as many as I usually try for because I'm already combining two challenges, one from SMC and one from SSDS):
Penny's Paper Crafts: Love/Valentine
Crazy 4 Challenges: Be my Valentine
Bee Crafty: Romance
Other Lovelies: Use digital stamp
Saturday Spotlight with Hidden Potential: Teeny Tiny (I claim my tiny hearts)

Stampotique Designer: Create a Love Theme Card
Ink on My Fingers: All you need is Love


Don't forget, all of the 2009 images are on sale in bundles of 30 for only $10


Tuesday, February 9, 2010

CAC sketch 2/9

Time for another Create a Card sketch Tuesday. Here's the sketch...
And here's my card....
I made a baby card with SMC's baby Zee. I used white and black flocking to make him fuzzy.
The paper is DCWV but I don't remember what company the ribbon came from (probably Oriental Trading but not positive about that). I finally used my Creative Memories punch to punch a decorative border along the top (inside too).


I have a couple of challenges for this card
Daring Card Makers: Amethyst (Feb. birthstone)
No Time to Stamp: Baby card
Secret Crafter Saturday: monochromatic color and White
Tellen's Place: Tic Tac Toe - Ribbon, Punch, button
Lexi's Creations: Spots or Stripes

Friday, February 5, 2010

SMC Color Challenge

Challenge is to use Red, Black and Silver.


I chose to use SMC's Cat with Heart and I colored her to look like my tortoiseshell kitty using my alcohol markers. I love how well my coloring turned outso much that I'm never sending this card out - I'll be keeping it forever. Anyway, back to my card...I cut it out, used a corner rounder then inked the edges with my red catseye ink pad. I used regular kitchen foil for my silver and embossed it with the Bubbles Cuttlebug folder. The ribbon is one that I found in my oldest son's room so I don't know where it came from (nor why he had a ribbon in there). I painted the bottom of the Acrylic Discs with a silver marker (two of them have air bubbles in them so they look like muppet eyeballs - LOL) then glued them with crystal clear accent essentials.

I'm entering this into a few challenges (you know me, I like to see how many challenges I can combine but it may be difficult once everyone stops asking for valentine theme cards):
DoodlePalace: Show-Me Texture
Fab N Funky: Embossing
Creative Belli: Ribbon
Charisma Cardz: Love
Dare U 2 Digistamp: Hearts/Valentine
Raise the Bar Challenge: Hearts

Be sure to also check out the awesome creations by my fellow Sew Many Cards design members:
Angela (Owner), Jeri (SMC DT Coordinator), Amber, Audrey,
Ceal P., Dawnn, Deanette,Donna Gloria, Jeanette C.,Jessica,
Kim G., Kym B., Kym W., Maria, Mary D., Mary S., Melissa,
Michele, Sarabeth, Patricia G., Patricia St. M., Sarah T.
Sherry L., Suzanne K., & Tammy M.