












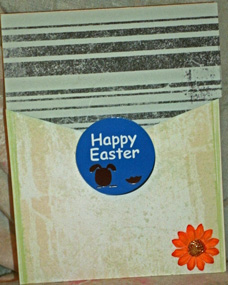


 I used this sketch to make a 4.25 by 5.5 card instead of a square card.
 I typed the sentiment and printed it with my printer then punched them with my Creative Memories circle punch. I also used the CM circle pattern to cut the larger circle. I cut 1.5 inch strip of paper and ran it through my cuttlebug with the Plum Blossoms folder. To make the flower behind VERY, I used two white acrylic flowers from Queen & Co. Fab Flowers "hottie" but to make them red, I used Alcohol Ink in Cranberry to get them that dark color. It's also the same red, just not as concentrated, on the large circle in the corner.


 that I found and a color challenge by A Muse Studio to use French Roast Brown and BubbleGum Pink. The Pink paper is a digital paper called DiamondGirl from Gina K at Stamp TV.
 I was following Stampavie's sketch and Color Q's color pallet. I colored Hershey the puppy with my alcohol markers and used some scraps of cardstock and designer papers. The flowers are from Oriental Trading Company Summer Fun and the eyelets came from Spare Parts by the Paper Studio. I decorated my solid cardstock with the Sizzix Folder Swirly Vines with Hearts.
 Here's Sew Many Cards' Bear with balloons and Happy Birthday sentiment. I used the sketch from Lili of the Valley Thursday Challenge, the color choices for my card at Colour Create Challenge, and I also have embossing which means I can enter into the Cardvarks challenge.
 This card is perfect for the 16 year old about to get his/her license. I colored Tayla with two brown markers and the tires with a gray marker then paper pieced the car. I used my alcohol inks to make a red/gold paper, a aqua/silver paper and a green/gold paper, then printed the car three times (once on each paper). After cutting the car body in red and the windows in blue, I did the bumper in green. I also cut the eye/headlights from the blue and tongue from red and glued them on top of their proper spaces. To darken up the window seal, I ran the gray marker in that spot. To finish the card off, I rounded the corners, matted it on a green cardstock scrap then on dark red card base.
 Well thanks for looking.


