
Thursday, April 15, 2010

How I color with Colored Pencils

Disclaimer1: This is my first tutorial.
Disclaimer2: I used my scanner for the photos and I'm just now noticing the glass surface needs to be clean.
Disclaimer3: Pardon the quality of the stamped image...my printer is starting to give me trouble and I used a ultra fine sharpie to fill in where it would skip (it doesn't do it consistently but I'm not going to print 1000 copies hoping to get a good image eventually). Someday, I'd like to get a new printer/scanner combo (my printer is so old that I'm starting to have a hard time finding replacement cartridges) but I just found out today that I'm not going to be working summer school (budget cuts) so there won't be extra money this summer this after. :(


**********
As you can see...I don't have to use fancy colored pencils. I have some, and I would love to have the entire color collection on a particular brand (probably prisma) but I can achieve what I need with what I've got. I have pictured here a Crayola pink, Pentech pink, an unknown brand of pink and another unknown red. I also have Rose Art brand colored pencils (I just didn't pull one out of my bag for this photo). I chose my colors by picking out several colors that are similar (think "Monochromatic"). The three pinks happen to look the same when I did a tiny test swatch so I only used one pink pencil and the red for my coloring below.

I wanted the ribbon to look like a satin ribbon and I know that the lightest part of the bow is near the highest point on the bow. I lightly colored up to that point.

Next, I colored the outer edges and the part next to the knot another layer of pink, pressing a little harder. As you can see, I didn't go all the way to the edge of pink/white border.


Then I used my red pencil to color the inside of the ribbon and the crease lines near the knot and the tie ends under the knot.


Then I used the pink to blend the red.


Now I'm ready to color the heart. This time I used the red to lightly outline where I wanted the shiny spot to be so I'd know where to stop.


And colored it lightly with the red pencil. There isn't a big difference between the red and the pink yet.


Then I colored a little bit more, but didn't go all the way to the red/white edge again.


Since I did not want a stark white "shiny" spot (to me that is for things that have a high gloss finish like hard plastic and I wanted this to look like a soft pillow), I took my pink pencil and lightly colored over the white area so that it blended in.


The finished product !!!

Monday, April 12, 2010

ALL Sew Many Cards Images are on sale

Get all of your Sew Many Cards digital stamps at a GREAT price!


ALL Images are on sale

It's that time again!
All of the Sew Many Cards digital stamps have been packaged up and put on sale- but it's only for a few short days, so make sure to get yours today! Visit the Sew Many Cards shop and look for the Specials

Packs:
2009 All Images - $25.00
2010 All Images- $25.00

**If you want both Packs, use coupon code APRILSALE and get 20% off **

For those that want smaller Packs:
January 2010 stamps - $10
February 2010 Stamps - $10
March 2010 Stamps - $10
April 2010 Stamps - $10

2009 Packs with 30 stamps per pack are $5 each


(C) 2010 Sew Many Cards

Sunday, April 11, 2010

one stamp - two different cards

I was sent these images for a swap.
And here's what I came up with.

I used colored pencils on the first image.
I also followed the current challenge at PaperCraftPlanet. Raise the bar challenge wants to see me "Spring for it" with flowers. I have the flowers in the vases and one on the ribbon plus the brad is a flower too. That makes 6 flowers total. I also used a thick chipboard tag from Flower Fairies (freebie set that came with a magazine bought at Barns & Noble). All edges were inked with Rubber Stampeed lilac ink (qualifying it for One Stitch At a Time's distressing challenge and Your Next Stamp's challenge to use purple.
* * * * * * * * * * * *
For my second card I used watercolors. I also tried out my Alcohol Inks. They were a lot of fun to play with (I made several "papers").
I colored the vases with aqua and blue pan watercolors (those are the kind you had as a kid in school). The flowers were colored with watercolor markers (various brands). I chose to use Lili of the Valley's color scheme of blue and silver (thus the color combo of Stream and Silver inks in the blending handle) and follow a sketch that is coming up on Create A Card. Lots to Do wants to see embossing so I embossed the bottom rectangle using Morroccan Screen, the side block with Checkerboard (both tilted) and the image mat using Oriental Weave (all Cuttlebug folders).

Friday, April 9, 2010

April Blog Hop winner

(Please forgive my blog layout, I'm in the process of re-doing it)

The winner from my blog is Sheena
To claim your free image, please contact Jeri @
sewmanychallenges.com (remove the spaces)

SMC CHALLENGE #10 - Stitching


LAST CHALLENGE FOR CURRENT DESIGN TEAM
: Sherry L, Kim G, Deanette W, Mary S, Amber H, Audrey E, Ceal P, Dawnn S, Gloria M, Jeanette C, Kym B, Kym W, Maria L, Mary D, Melissa W, Michele L, Sarah T, Suzanne K, Tammy M, Sarabeth, and Jeri
Come back next week to meet our new team and see who stayed.
AND
If you need to know how to use digi-stamps,
go to SewManyCards Tips and Tricks page to learn more.

Don't forget to go to Sew Many Challenges to get this week's Friday Freebie.
I'm sorry I don't have it ready to show you today, it's been one of those busy weeks.
Some of it good - like the Kindergarten "Barnyard Moosical" while some of it was just plain busy.
Nothing bad happened (thank goodness) but I'm behind (got over 70 emails to take care of). Husband and older son are camping with their Boy Scout troop this weekend so with any luck, I'll be able to find time to craft and do something with it.

* * * * * * * * * * * * * * * * * * * *

Who is the sponsor this week?
STITCHY STAMPS -
http://stitchybearstamps.com/shop/
SPONSOR PRIZE PACKAGE -- 3 Free Digi stamps of winners choice from the Stitchy Bears Store

Hi Everyone, my name is Stitchy and I create under the name Stitchy Stamps...I have been creating digital images for designers for almost a year now and try to learn something new everyday...I started out in paint shop pro about 8 years ago and started making digital scrap kits...then I was introduced to the wonderful world of paper crafts and card designing...like I said, learning new everyday, the rest is history...I can't draw enough to keep me satisfied anymore lol...
Living in a small town in upstate New York, tucked away where cable doesn't even go...friends are far and few between...Bu
t being on the internet for the past 10 years, I have gathered quite a few from around the world...Just like I learn something new everyday, I also try to meet someone new every day too...
Thank you Angela and Company for allowing me to sponsor for you...I am truly honored...

* * * * * * * * * * * * * * * * * * * *
What's the challenge? TECHNIQUE CHALLENGE -- PROJECT USING STITCHING. It can be real stitching with a machine, faux stitching, pen/marker stitching, whatever your fancy.

On my Create a Card group, the "Make it Monday" challenge was to make a bookmark card so that's what I have tried here. I used Michelle's measurements because I liked the idea of a skinnier bookmark (in relation to the height). I cut it 10 1/2" x 5 1/2". I then scored at 4 1/4" and perforate at 8 1/2". I used a 12x12 cardstock by Heidi grace Designs called Loving You Stripes. Then I used Cowboy Boot Donkey for my image and colored him with my alcohol markers. I did decorate the patch on Donkey with white dots to make it look like a scrap piece of fabric was really sewn on him. I used a white gel pen an a green ultra fine point sharpie to create my faux stitching. I chose three prima flowers (the ones with O's are called Abby but the solid pink I don't have a name for it), two green glitter brads and one Oriental Trading Co. pink gem brad, and the buttons came from a grab bag from Walmart. I screwed up the sketch and had to add a circle that I had punched out extra for another card but didn't use (luckily it was mostly pink and green on one side). The pink border was also left over from a card making evening. Below you can see the bookmark that the recipient will be able to tear off.

* * * * * * * * * * * * * * * * * * * *
Challenges:
Stamp with Fun: 3 Papers, 3 Flowers, 2 Buttons
Cuttlebug Spot: Celebrate Our Colors - Pink & Green
Stamp Something: stitching
Die Cut Dreams: Boots/Shoes
Crafty Card Makers: Challenge yourself - Try a new Technique
Crafty Angels online: Sketch (that I messed up when gluing my flowers so please forgive that mistake LOL)


Sunday, April 4, 2010

Happy Easter


I colored SMC's Jovi with Dragonfly with my alcohol markers then used the Spica glitter markers on the dragonfly to add some sparkle. I used my Creative Memories oval cutting system to cut out Jovi and the mat then adhered it to the top half of my card. I chose two flowers from my Oriental Trading Company Purple blossoms jar and a coordinating brad also from OTC. Then I took some lavender ribbon from my ribbon holder, put a bow in it, and glued a button in the middle of the bow. I could not find a Easter stamp (I swear I have one but I guess I don't have everything put away yet LOL) so I took a light purple Sharpie marker and wrote "happy Easter" myself.

= = = = = = = = = = = = = = = = = = = = = = = = = =

Ooh-La-La-Creations: Challenge #50 - A Button, A Bow and some Bling
Scrapper in Romania: 1st Challenge - Lavander, and Cream White/Ivory
Stamp Scrap and Doodle Saturday : Flights of Fancy/ Anything with Wings
One Stitch at a Time: Anything (also Crafty Creations)

Thursday, April 1, 2010

SMC's April Blog Hop

APR MONTHLY SPONSORS (prizes will be awarded during the New Release Blog Hop)
APR 1st -- APR 29th
THE CUTTING CAFE ... OWNER -- REGINA EASTER

The cuttingcafe blinkie

Prize package -- 3 Stamp Sets of winners choice

Hello my name is Regina Easter. I have 4 wonderful children and an awesome supportive husband. I have for as long as I can remember loved all the aspects of creating things with paper and drawing. So it was only fitting that I decided to open up The Cutting Cafe'and I am loving every bit of this new venture. The Cutting Cafe offers affordable Printable Stamps and Cutting Files. The Cutting Files which are basically just like templates are files that you Print out using your home printer, Cut, Assemble and then Embellish.....Very Easy.....The Cutting Files also come in the format where you can cut out the files using some of the latest Machine Cutters like the Pazzles Inspiration, Bosskut Gazelle and Cricut (with Scal software). The Printable Stamps are just that, images that are sent to you through email that you print out using your home printer. After the images are printed out, you can just color them in like you would any other stamped imaged...One great thing about the Printable Stamps and Cutting Files is that you no longer have to worry about finding space to store all of your stamps....You can keep them all in a folder in your computer and use over and over again.


MONTHLY SPONSOR for 2010 --SIMON SAYS STAMPS
APR 1st -- APR 29th
Sponsor Prize Package -- $10 Gift Certificate
Photobucket

This blog hop will run from today, April 2nd until April 8. On the 9th, the winner will be announced. Thank-you for taking the time to hop along. You should have come from Mary S.'s blog. When you are finished hopping, why not check out the Sew Many Cards Store! There you can find the current challenge and this week's Friday Freebie.

I'd would like to also remind you of the monthly challenges we have at Sew Many Cards Challenge Blog!
My creation this week is a card....they are my favorite thing to make. I love to color, as you know if you've visited my blog much! Angela is ushering spring in with some very cute images. I have GIRL WITH HEARTS to show you.

I colored the girl with my alcohol markers (my one Copic flesh color and the rest of them are Bic, Sharpie, or Prisma color markers). I used a teal green ink and a makeup sponge to sponge the edges of the light blue cardstock. I also used it on the smaller orange flower. I used 3 orange brads from Making Memories Citrus and the flowers are Making Memories Hulabaloo. The Springtime sentiment was in a grab bag from Boni back when I was on the SSDS design team. I'm able to find everything now that I'm finally getting my craft room back. :)

Now, to continue the blog hop, please visit Amber and if you'd like to see the Friday Freebie in use, please scroll down to my next post. Don't forget to leave me a comment if you'd like a chance to win a free SMC digi-image.

And now for the challenges:________________________
Sketch & Stash Challenge: Their Sketch
PaperTake Weekly Crafty Creations: Anything
Quirky Crafts: flowers
Stamptacular Sunday: Flower Power
Totally Paper Crafts: Digital
Stampative: Friendship
The Crafty Pad: Green, Orange, & Yellow (I know there's not much yellow but hopefully enough)

Friday Freebie & CAC sketch

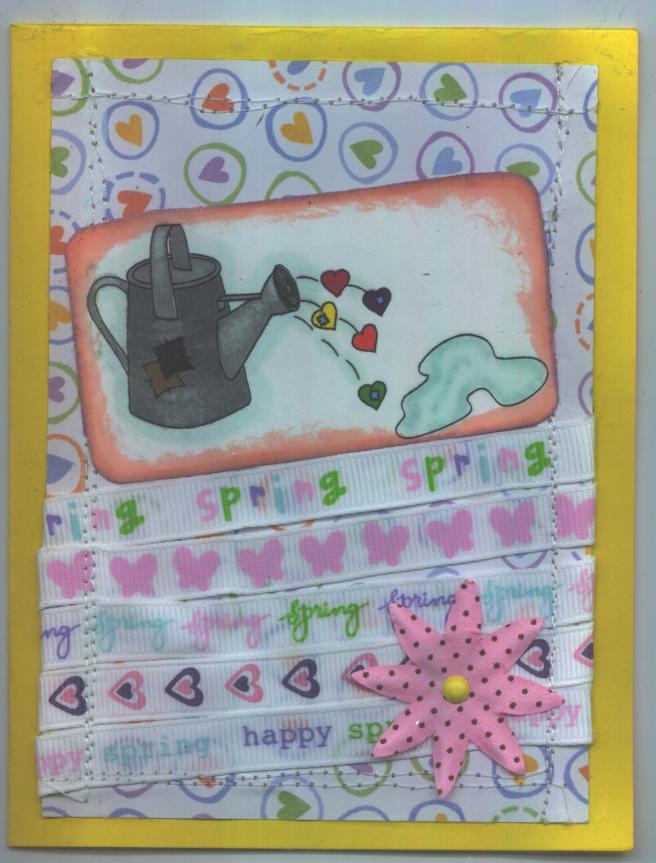
I followed the above sketch to create my card using today's Friday Freebie that you can find in the store, newsletter or challenge site. The sketch looked like a good way to use scrap paper but I thought it would also be a good way to use scrap ribbons. I didn't choose wide enough ribbons to angle them (I tried and it didn't look good IMHO). After attaching the ribbons, I took it to my sewing machine (uncovered after so many months of not being able to get to it) and sewed the border twice with white thread.
I colored the watering can with my alcohol markers. I tried to make it look like an old tin watering can by using a colorless blender in the middle of the spout and the can part and at the top of the carrying handle. I used one shade of aqua blue in the puddle then blended the lines with Cool Shadow (one of my copic colors). After trimming it down (trying to get it on the same angle as the ribbons) and rounding the corners, I inked the edges heavily with a pink ink pad followed by a purple on the outside only. I then finished off the bottom corner with a Making Memories Hullabaloo flower and yellow Making Memories Citrus brad.

Challenges to enter this card into:
Crafty Cardmakers, Sassy Design Studios, Everybody Art, Fab N Funky, Forever Friends, Little Red Wagon, Nutshells: Spring into Spring
Simon Says Stamps: Distressing (I wish I had Tim Holtz inks but alas, I used other inks)
Incy Wincy Designs: Sewing/Stitching
The Pink Elephant and Mo's Digital Pencil: Pastels
Digital Tuesday: Scrap it
Totally Paper Crafts: Digital
Crafty Creations: Anything